
VR/AR Setup
Important Notice
1: Check that your PC is able to run VR before starting the process of integrating it into Unity/ Unreal Engine. More Info about specs needed here: More Info
2: We used Windows 10 (Version 1909) with Samsung Galaxy Note 10 and Huawei P20 (Android Version 10) for setting up these instruction and therefore there might be different behaviors based on what phone and version of windows you are using on the PC.
3. The instructions were last tested in Unity version 2019.4.2f1, later versions might get errors that have not been found during the testing sessions. Also earlier versions might not have all the menus and buttons that have been shown throughout the guides.
Contents
Oculus Quest (Unity)
- Install the Oculus App on your PC from: Oculus Setup: Rift S, Rift, Quest & Go.
- Log in with you Facebook/ Oculus account or register at: Create an Account.
- Choose which Oculus you got, for the application to get the correct drivers.
- Connect the cables from the sensors to any of the USB Ports on the PC. (3.1 also works).
- Turn on the Oculus Quest with the button on the right side on front.
- When wearing the headset, you need to confirm the Guardian of the Oculus. This is done with the right controller by pressing the button on the back of the controller.
- Go to setting in the Oculus app and then choose the Beta Tab, Enable public. Enable public test channel. This is to make the USB connection more stable.
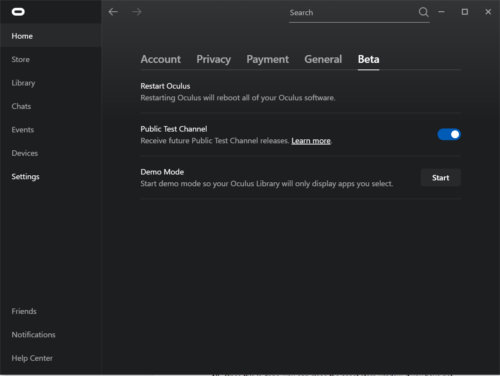
- Wait for the software updater to be finished.
- Go to Settings > Headset Tab > Enable Oculus Link(Beta) in the menu in the Oculus headset. After this has been done, the beta functionality for the Oculus will be active.
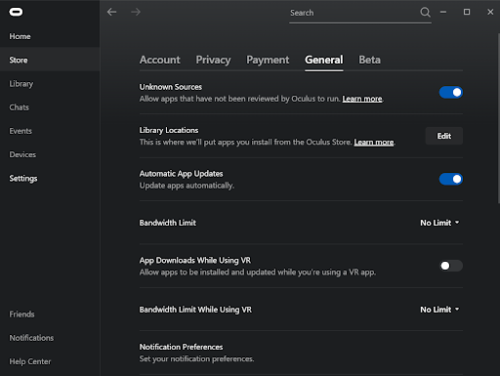
- In the Oculus App, go to Settings > General Tab > Activate Unknown Sources to be able to use the headset with other software than the Oculus App. Like for example Unity and Unreal Engine.
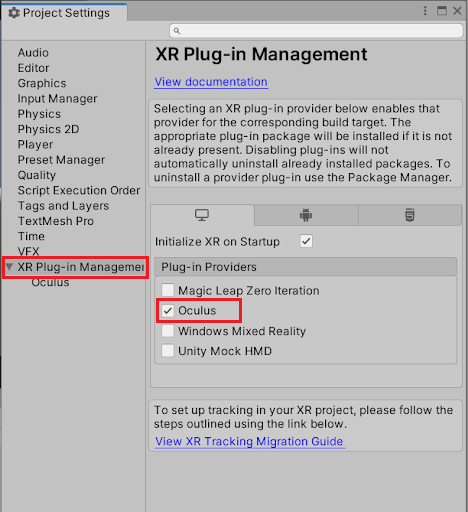
- In Unity, go to Edit > Project Settings. A new window will then appear. Click on XR Plug-In Management on the left side of the new window and activate the tick box that says Oculus.
- Go to Project Settings > XR Plug-In Management and expand it. Click on the Oculus tab and tick the Oculus Box.
How to add a player
- Go to Window/Asset Store and search for the Oculus Integration asset. Download the asset
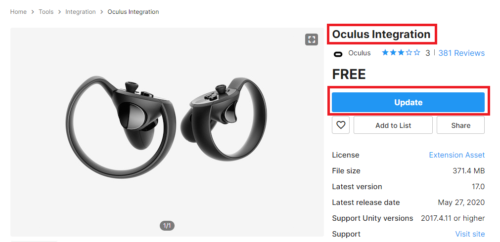
- When download is complete, a blue button with import will appear. Import everything into the project. There might appear some small windows after you have importet the asset. Make sure to click the already highlighted buttons.
- Once this is done, you can close the asset store window, if you have not plugged in the Oculus Quest before, you can do so now.
- When you put the headset on your head. Confirm the ground height and the play space that you have available with your right controller and press confirm.
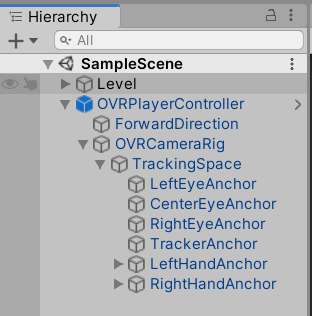
- Go back into Unity and remove the current MainCamera in the Hierarchy. Go down to the Project panel and search for OVRPlayerController. Then put the OVRPlayerController prefab in the hierarchy instead.(This was downloaded in the Oculus Asset Package).
- Test that everything is working correctly by pressing Play in Unity and see if the camera responds to the movement of the Oculus Quest.
- You can also check that the joysticks are working by using the thumb sticks, while the thumb sticks on the left controller will move you forward in the direction you look towards.
How to show controllers in Unity
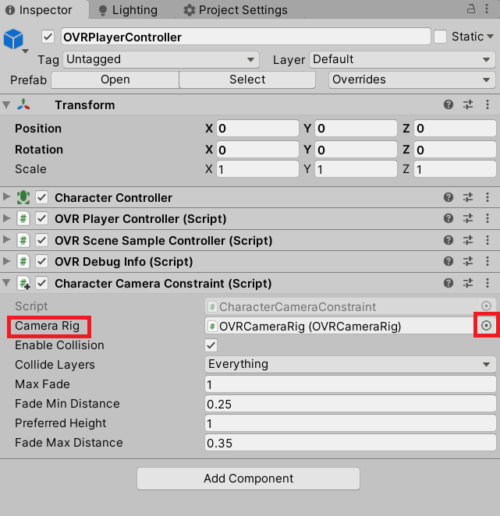
- Click on the OVRPlayerController (Hierarchy) and click on add component in the Inspector that is on the right side and search for CharacterCameraConstraint and add it.
- On the CameraCharacterConstraint in the CameraRigTab, click the circle on the right side of the box and add OVRCameraRig from the new tab that appears.
- If it does not appear in the menu that pops up, go to the project tab and search for CameraRig and it should appear.
- If it does not appear in the menu that pops up, go to the project tab and search for CameraRig and it should appear.
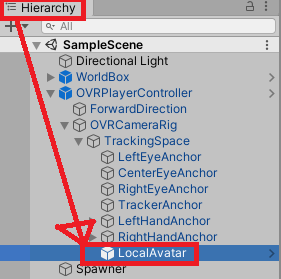
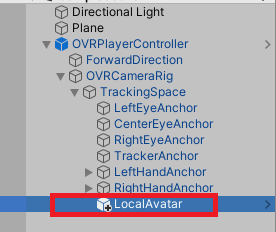
- Go to the Project panel and search for the LocalAvatar prefab and drag it into TrackingSpace in the hierarchy under OVRPlayerController prefab.
Making hands able to interact
- Find LefthandAnchor and RightHandAnchor under the OVRPlayerController in the hierarchy.
- Select them both and add a sphere collider.
- Set to radius 0.5
- Check IsTriggerBox
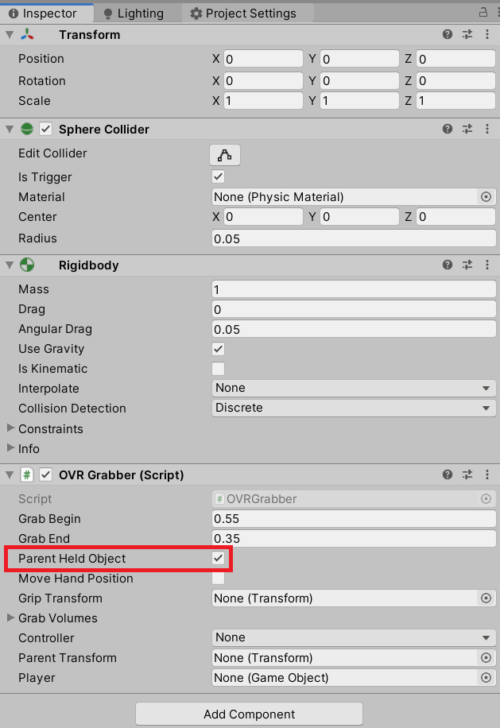
- Add OVRGrabber script to both.
- Check ParentHeldObject or you will see some jumpiness when holding and object and moving your hands.
- Expand the RightHandAnchor and the Right ControllerAnchor under it.
- On the RightHandAnchor, drag and drop the RightHandControllerAnchor to the GripTransformField
- Under GrabVolumes on the RightHandAnchor set the size to 1.
- Drag the sphere collider of the RightHandAnchor into the field that will appear beneath.
- In the controller dropdown menu, select R Touch.
- Expand the LeftHandAnchor and the Left ControllerAnchor under it.
- On the LeftHandAnchor, drag and drop the LeftHandControllerAnchor to the GripTransformField
- Under GrabVolumes on the LeftHandAnchor set the size to 1.
- Drag the sphere collider of the LeftHandAnchor into the field that will appear beneath.
- In the controller dropdown menu, select L Touch.
If hands do not show
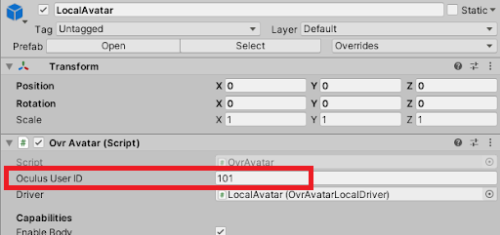
- If the hands do not show after the process, it might have to do with the ID being 0. This can be fixed with changing the ID.
- Oculus > Avatars > Edit Settings from the tab menu at the top menu in Unity.

- Change both of these numbers to something you want.

- It also has to be changed on the LocalAvatar (Oculus User ID)
- Oculus > Avatars > Edit Settings from the tab menu at the top menu in Unity.
- Go to Window/Asset Store and search for the Oculus Integration asset. Download the asset
Vive (Unity)
- Install the Vive App on your PC from: Get Started with VIVE
- Log in with either Steam/ Google/ Facebook Account
- If no account, register at: Welcome to HTC Account
- Get a room that is big enough:
- Minimum 2mx1.5m
- Pick a spot for the play area
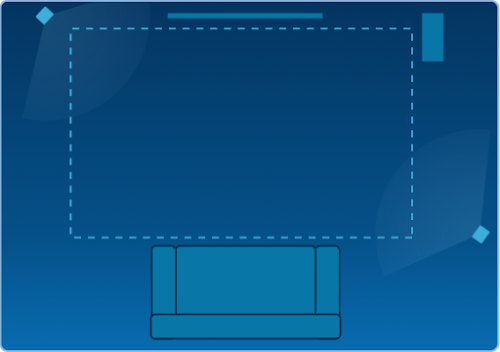
- Pick a spot for the sensors(Bases) and set them opposite of each other. (They will each need a power outlet)
- You will have to use the controllers that come with the headset or else they will not properly connect. You also have to be in SteamVR on the PC for the headset to turn on.
- The sensors should be above head level (Over 2m)
- Angled towards towards the play area at an angle of 30 - 45 degrees.
- Have unobstructed view of each others.
- Adjust the sensors
- If old one:
- Press mode on the buttons on the rear of the sensors and make sure that one is lit up with a B and the other with C. The light will be showing at the front of the camera.
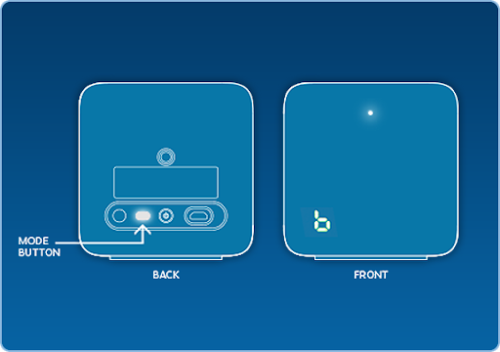
- Press mode on the buttons on the rear of the sensors and make sure that one is lit up with a B and the other with C. The light will be showing at the front of the camera.
- If it's the new one, they should up automatically and be assigned letters.
- If old one:
- Connect the link box (The side that does NOT have orange ports)
- Use the HDMI cable to connect the link box to your computer
- Plug in a power cord and plug it into a power outlet
- Once it's connected to your computer, it should automatically start downloading and installing the drivers needed.
- Install headset
- The end of the headset has 3 in 1 tether of tree orange tipped cords. (USB, HDMI and Power). Plug in all these to the link box on the side WITH orange ports.
- After this, the computer will start automatically install drivers for the headset itself.
Integrating VIVE with Unity
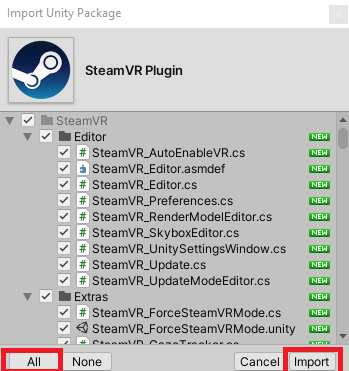
- Open a project create a new and go to Window > Asset Store and import SteamVR Plugin.

- Import all when you get prompted for what to import into the project.
- Some versions of Unity might require and API update, press I Made a Backup. Go Ahead!
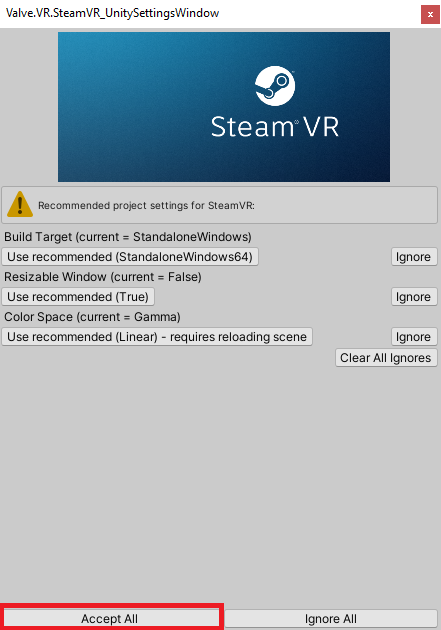
- You will get a window for optimizing the VR settings, accept all for it to automatically set the best settings.
- Open the SteamVR > InteractionSystem > Core > Prefabs and select [Player] prefab and drag them to the hierarchy in the current scene.
- Delete the MainCamera, as this one will not be used in the project when using VR.
- Import all when you get prompted for what to import into the project.
Binding buttons to actions in Unity
- When pressing play in Unity, there will come a pop up to ask you to generate the JSON files for the controllers which contains the info about all the actions that the buttons do.
- Press Save and Generate when SteamVR Input window comes up, then close the window down.
- Activate teleporting:
- Find the teleporting prefab which is located in the SteamVR > InteractionSystem > Teleport > Prefabs folder and drag it into the hierarchy of the scene you are working in.
- Add a plane by Right Clicking > 3D Object > Plane in the Hierarchy.
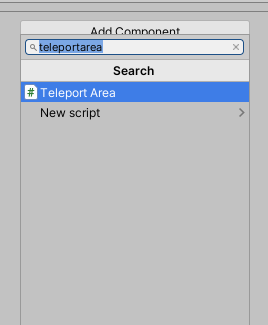
- Click on the plane and press on the right side in the inspector and Add Component. Add the TeleportArea. Write that in the search bar that comes up and it should show up.
- You need to take care that the Player and Teleporting prefab in the Hierarchy is at least 0.5 over another GameObject or else the teleportation function will not work.
- The player also has to be above the teleportation plane, or else it will not work.
Vive (Unreal Engine 4)
- Install the Vive App on your PC from: Get Started with VIVE
- Log in with either Steam/ Google/ Facebook Account
- If you have no account, register at: Welcome to HTC Account
- Get a room that is big enough:
- Minimum 2m x 1.5m
- Pick a spot to use as the play area
- Pick a spot for the sensors(Bases) and set them opposite of each other. (They will each need a power outlet)
- You will have to use the controllers that come with the headset or else they will not properly connect. You also have to be in SteamVR on the PC for the headset to turn on.
- The sensors should be above head level (Over 2m)
- Angled towards towards the play area at an angle of 30 - 45 degrees.
- Have unobstructed view of each others.
- Adjust the sensors
- If old one:
- Press mode on the buttons on the rear of the sensors and make sure that one is lit up with a B and the other with C. The light will be showing at the front of the camera.
- Press mode on the buttons on the rear of the sensors and make sure that one is lit up with a B and the other with C. The light will be showing at the front of the camera.
- If it's the new one, they should automatically and be assigned letters.
- If old one:
- Connect the link box (The side that does NOT have orange ports)
- Use the HDMI cable to connect the link box to your computer
- Plug in a power cord and plug it into a power outlet
- Once it's connected to your computer, it should automatically start downloading and installing the drivers needed.
- Install headset
- The end of the headset has 3 in 1 tether of tree orange tipped cords. (USB, HDMI and Power). Plug in all these to the link box on the side WITH orange colored ports.
- After this, the computer will automatically start installing the drivers for the headset itself.
Integrating with Unreal Engine 4
- Open up Unreal Engine and select the Games tab under the New Project Categories header, then click next.

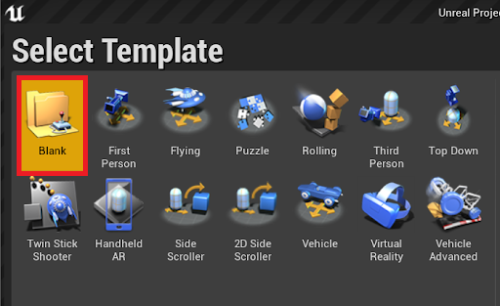
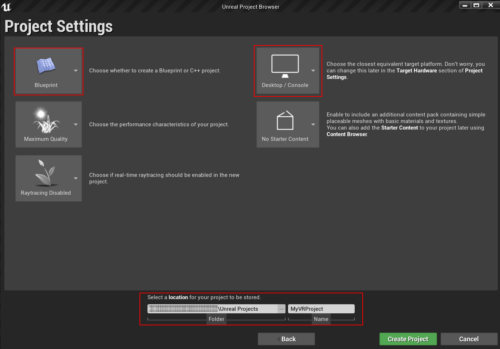
- Select the Blank from the Select Template and click next.
- Make sure you use Blueprint and choose the target platform as Desktop/ Console. You can choose if you want the starter content. For this example i will not be using the starter content. Choose a place to save your project and what to call you project. The press Create project.
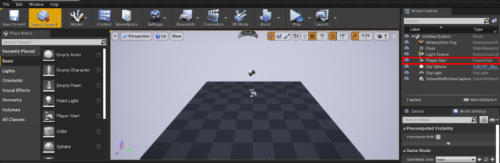
- When everything has loaded. Delete the Player Start actor in the World Outline.
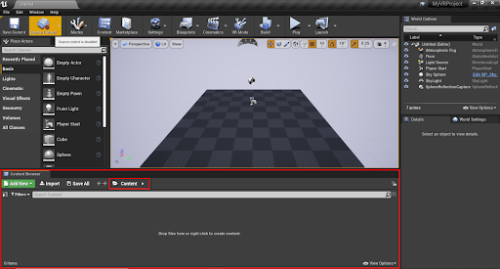
- Inside the Content Browser right click on Content folder. You will then get a drop down menu, Click the Blueprint Class tab.
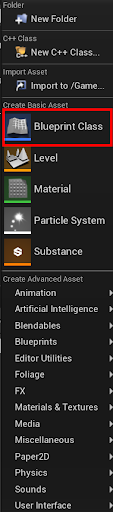
- Inside the pick parent class, click the character button.
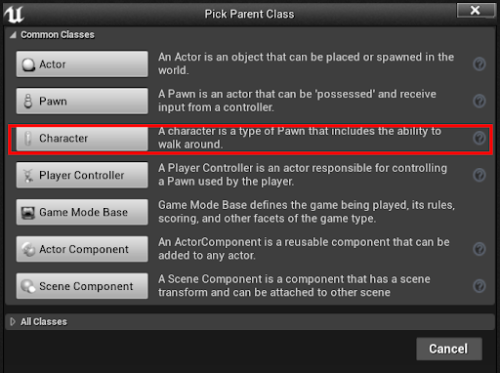
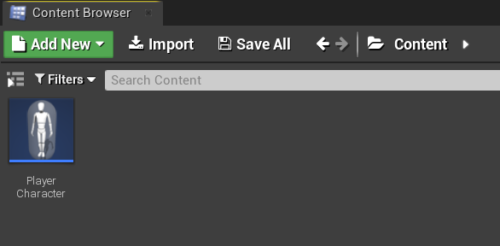
- This will be your player character in the game. I called my character PlayerCharacter. Make sure you name it something you will remember.
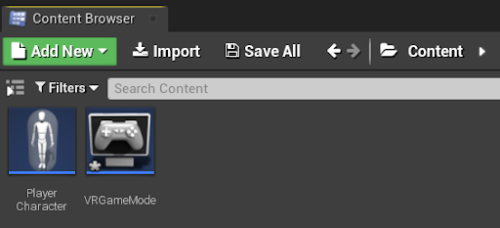
- Right click inside the Content folder inside the Content Browser again. Choose the Blueprint Class and now click the Game Mode Base. name it something you will remember. I named it VRGameMode.
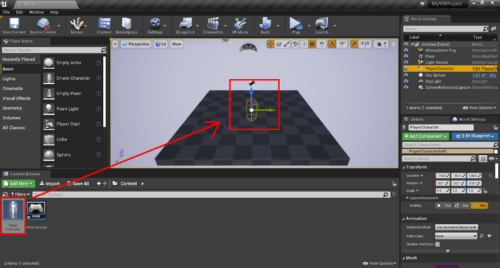
- Drag you Character into the Level. You should now be able to put on your VR headset and look around in the Level. You will notice that you are at the same position as your Character. That is fine, it will be fixed later.
- Double click the Game Mode Base and a new window will open Inside it. Under Classes, find the Default Pawn Class. Open the drop down menu and select your Character as the Default Pawn Class. Then press Compile and Save buttons in that order. You will know it has compiled once the button has changed from question mark to check mark.

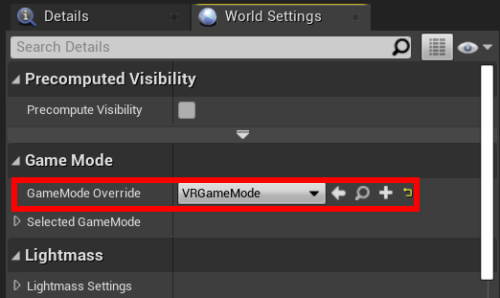
- After this, we need to make sure that the Game Mode Base we made is the one in use. Click on Settings and World Settings. On the right side of the screen a menu will come.

- In the World Settings find Game Mode and change the GameMode Override to your Game Mode Base.
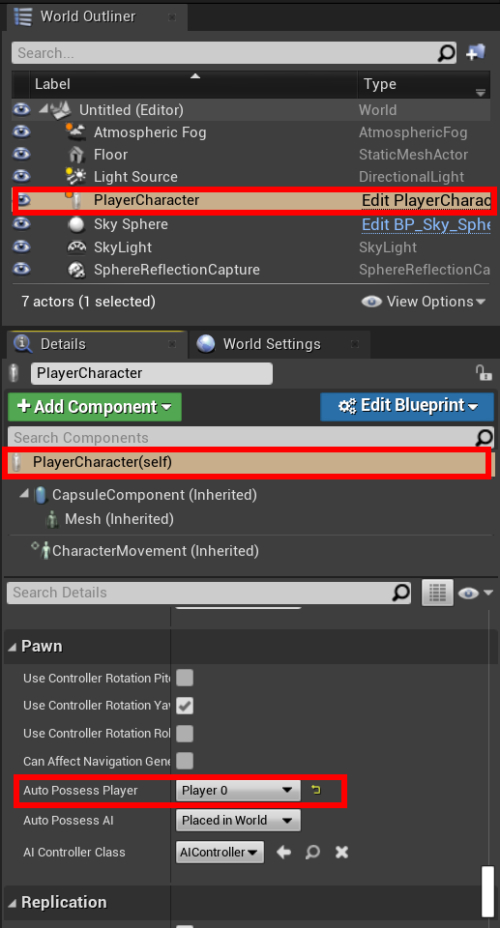
- In the World Outline select your Character. In Details make sure you have the Character selected and not any of the children. Scroll down until you find Pawn. Change the Auto Possess Player from Disabled to Player 0. If you play now, you will start where your Character is located.
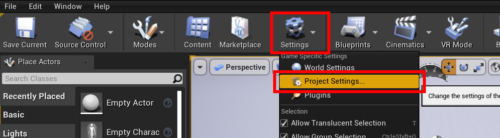
- The next thing will be to add movement to your Character. We will make a Locomotion controller. Firstly, under the Settings tab, click the Project Settings… A new window will open.
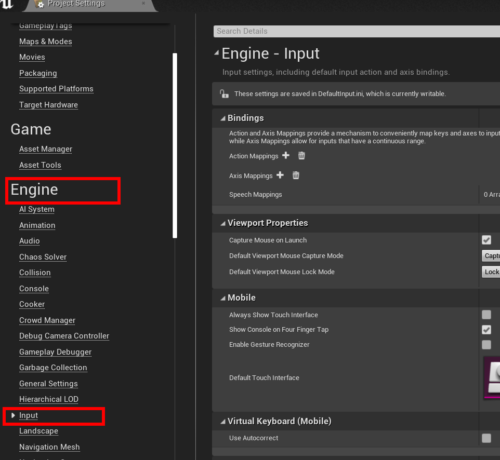
- In Project Settings, go to the left of the screen and scroll down until you find Engine.
- Under Engine, find the Input tab.
- Now we must apply some inputs for the touch controllers for the VR headset. We will be able to move forwards, backwards, right and left with the joystick for the left touch controller. We will be able to rotate both right and left with the right touch controller. We will also be able to hold down a button to pick up some objects.
- To be able to move, go to Bindings and press the plus icon beside Axis Mapping. Expand Axis Mappings and name the Axis Mapping. I will call it Move_Forward. Expand the Axis Mapping and press the Select the key value. Find HTC Vive, expand it and select Vive (L) Trackpad Up. And you just do the same process with the rest. In the end it should look like the how it does on the picture beneath.
PS: Remember to make sure that the Scale values are correct. Else the movement could become wrong.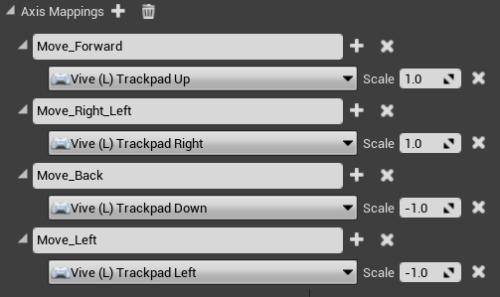
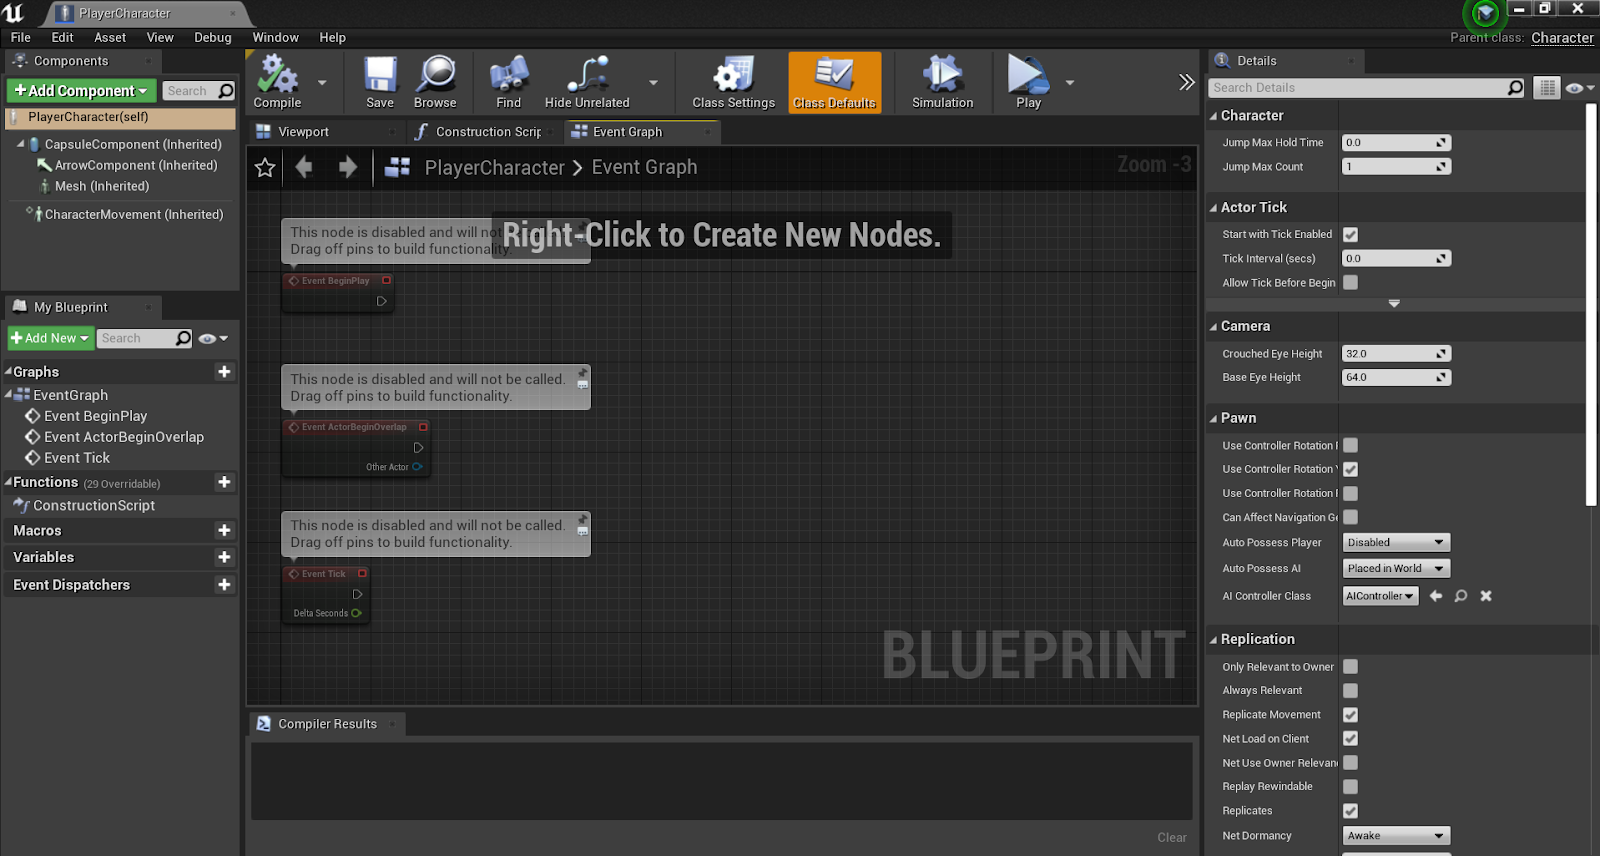
- Close Project Settings. We will now make the inputs we defined work with the Character. Double click your Character to open it. You should have a window looking like this.
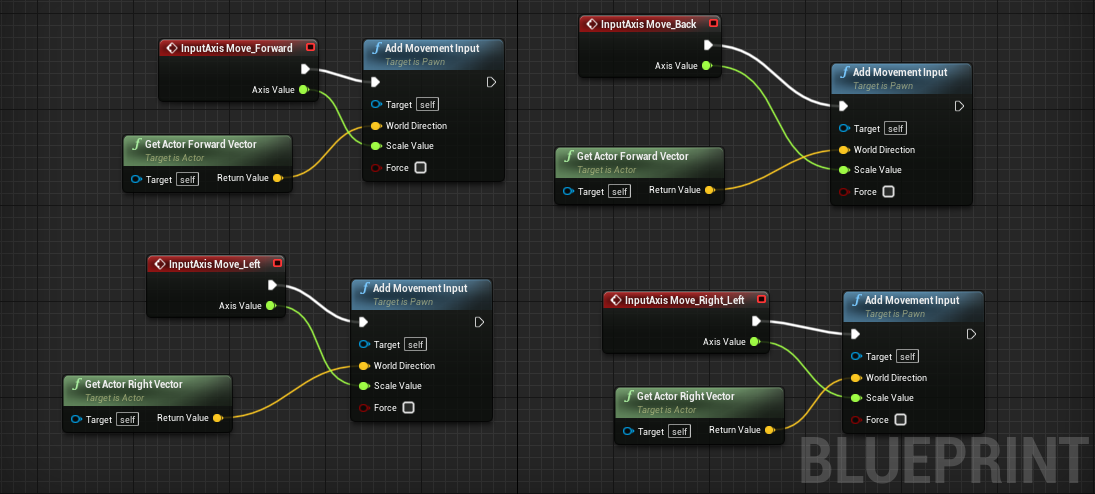
- First, delete all the nodes in the middle window. To create a node, you right click inside the window and search for the node you want. We want the inputs we made, so I search for Move_Forward. Make sure to select from Inputs and Axis Events. The node you get should be red. The next node is the Add Movement Input. The last node is Get Actor Forward Vector. After you have added all the nodes, connect them like this.
- You also need to do the same with Backwards, just instead of searching for Move_Forward. You search for Move_Backwards.

- You also need to do the same with Backwards, just instead of searching for Move_Forward. You search for Move_Backwards.
- You can now press Compile and Save. If you play the game now you should be able to move towards where you are looking and backwards in the opposite direction.
- You can now do the same for the movement to right and left. Like it is done in the picture below. You should now be able to move left and right as well.
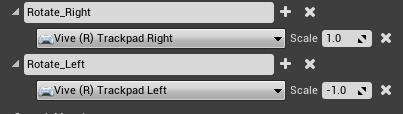
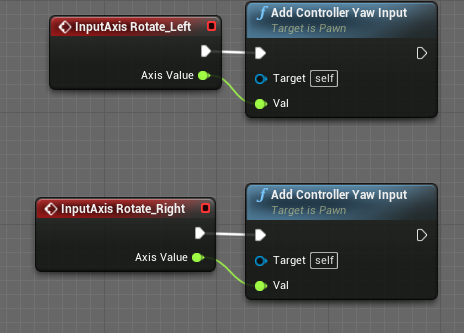
- Now we will make it possible to rotate with the right Vive Controller. Go to Input in Project Settings. Add a new Axis Mapping and bind Vive (R) Trackpad Right and Left. And set Vive (R) Trackpad Left value to -1.
- Inside your Character add your rotation input as well as an Add Controller Yaw Input. Connect them like shown below.
- Compile and save. You should now be able to rotate with your right Vive controller.
- Now it’s time to add the Vive controllers and make you able to grab some items with them.
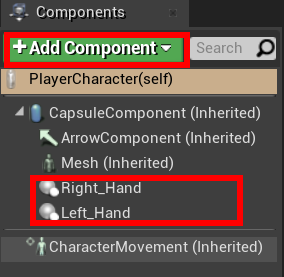
- To add the controllers, you need to open your Character. Inside Components press Add Component and search for Motion Controller. Add one for each and call them something you will remember. I called them Right_Hand and Left_Hand.
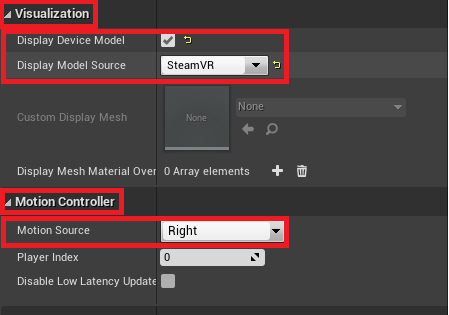
- Select one of the Motion Controller components and go to the right of the screen to Details. Find Visualization and enable Display Device Model. In the Display Model Source, choose SteamVR. Then find Motion Controller under Visualization. Make sure that Motion Source is set to the correct hand. Do the same for the other Motion Controller.
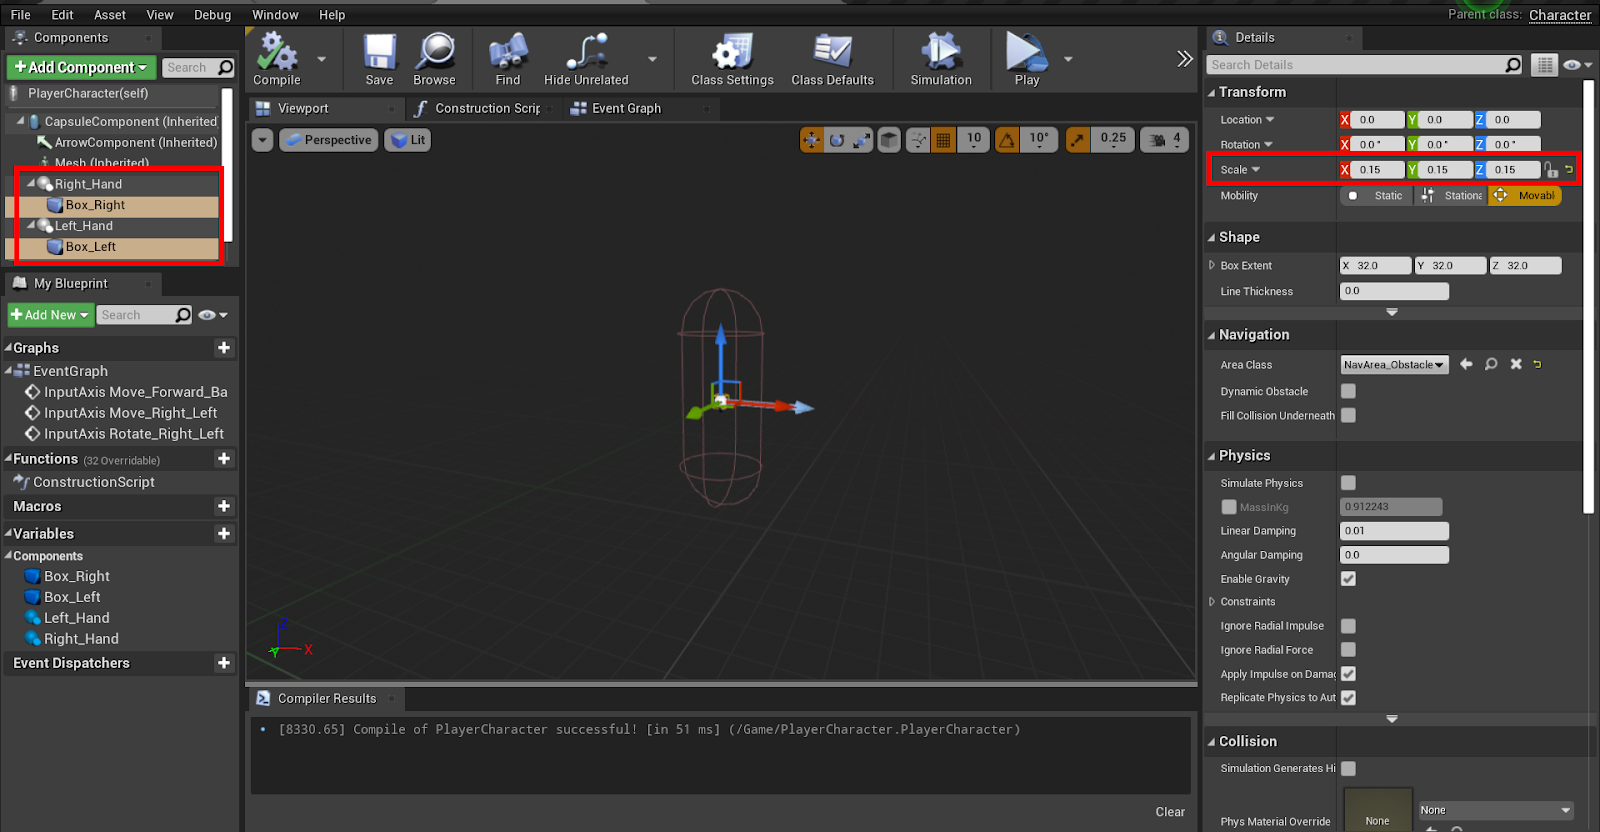
- Select one of the Motion Controller components. Press Add Component and search for Box Collision and add it. Set the Scale of the Box Collision to 0.15 in Details and Transform. Do the same for the other Motion Controller. Press Compile and Save. You should now be able to see your controllers when playing.
- Go to Components in your Character and Add Component. Search for Camera and click it.
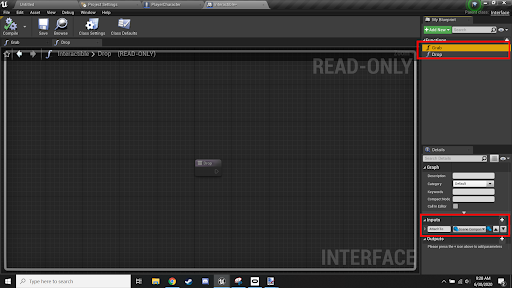
- The first thing you need to do is to make an Interface. The interface will be a way to determine if the object you are touching can be picked up. Right click inside the Content Browser and hover over Blueprints and click Blueprint Interface. Call it something you will remember. I called mine Interactible.

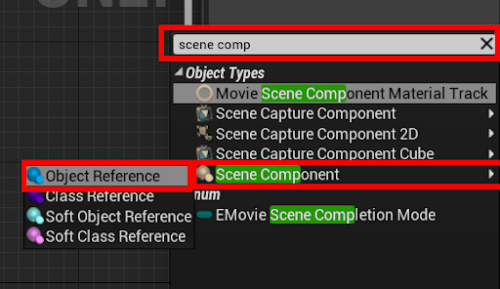
- Open the Interactible. On the right side inside My Blueprint make two functions. One grabbing up the object and one for dropping the object. I called mine Grab and Drop. When we grab the object, it should know what is grabbing it. Select the Grab function, inside Details press the plus icon beside Inputs. A new parameter will appear, call it something you will remember. I called it AttachTo. Change from a bool Parameter to a Scene Component as an Object Reference. The press Compile and Save.
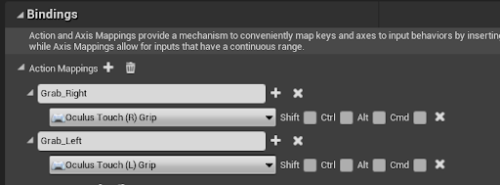
- We will now make the hands be able to pick things up. I’m starting with the right hand. The first thing you need to do is to add some button inputs to check if you are grabbing. Go to Project Settings and Input. Press the plus icon beside Action Mapping. Add two actions. One for the right hand grab and one for the left. Call them something you remember. I called them Grab_Right and Grab_Left. For the Grab_Right add Vive (R) Grip, and Vive (L) Grip for Grab_Left.
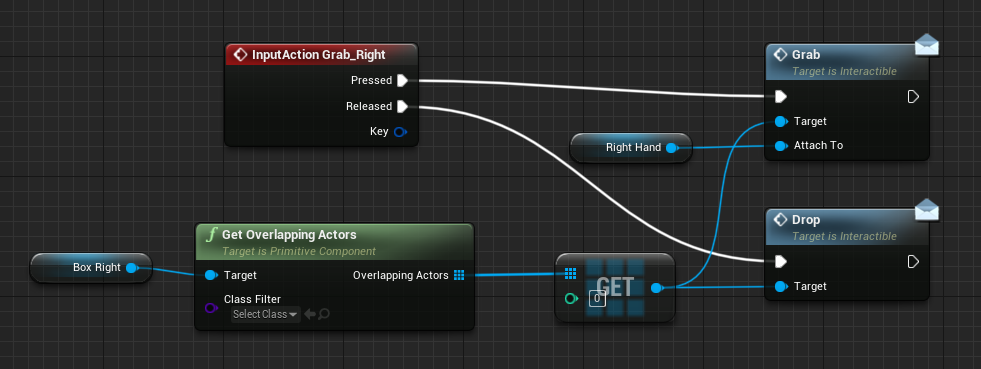
- In your Character, right click, search for Grab_Right and add the InputAction Grab_Right. Then, right click and search for Grab and add Grab(Message).
- Right click and search for Drop and add Drop(Message). Search and add Get Overlapping Actors (Box_Right).
- Drag the Motion Controller component for the right hand into the field as well as it’s Box Collider. Search and add Get (a copy), and lastly connect the Nodes as done here.
- Do the same for the left Motion Controller component. Then Compile and Save.
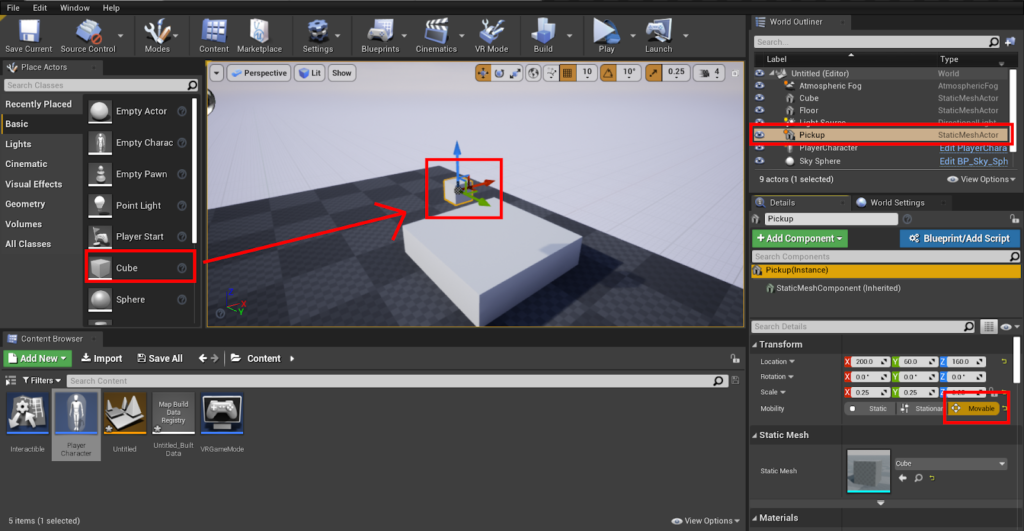
- Now it is time to add the objects you can pick up. From Place Actors drag Cube into the level. Call it something you remember in the World Outliner and make sure it is Movable in Details under Transform. You can also scale it down like I have done under Transform. I scaled it to 0.25.
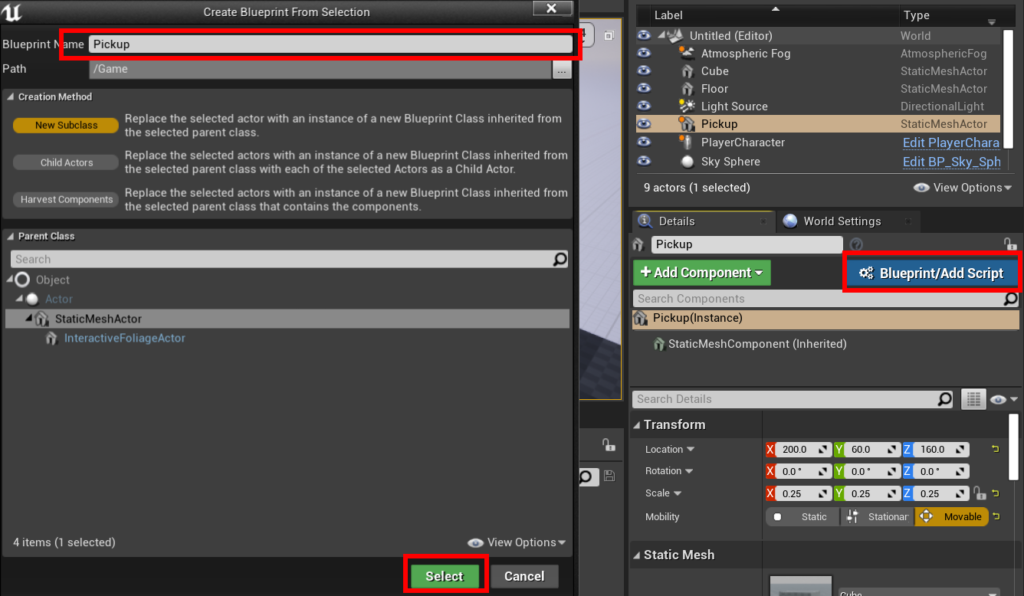
- In Details, click the Blueprint/Add Script button. Give it a name and press Select.
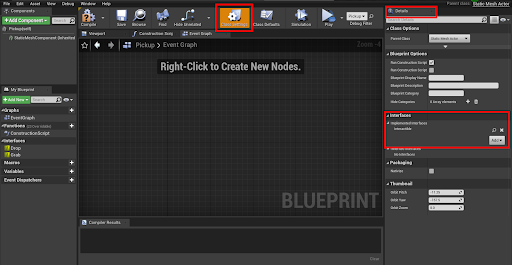
- After the new blueprint has opened, go to Event Graph. Delete the existing Nodes, but before adding new nodes we need a reference to the interface we made earlier. Click Class Settings, in Details find Interfaces and add the interface we made. Press Compile and Save.
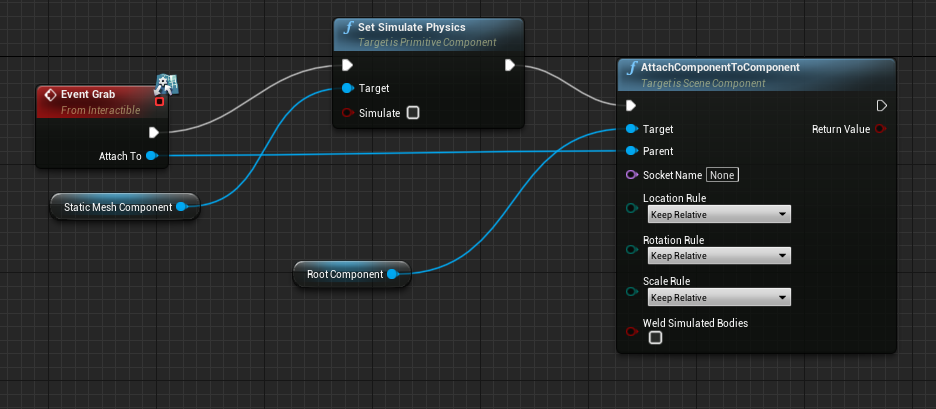
- Right click inside the Event Graph, search and add Event Grab. Then add a Set Simulated Physics node. This node should generate a Static Mesh Component. Keep this node and add it if you do not get it. Search and add an AttachComonentToComponent node, as well as a Root Component node. Then connect them like this.
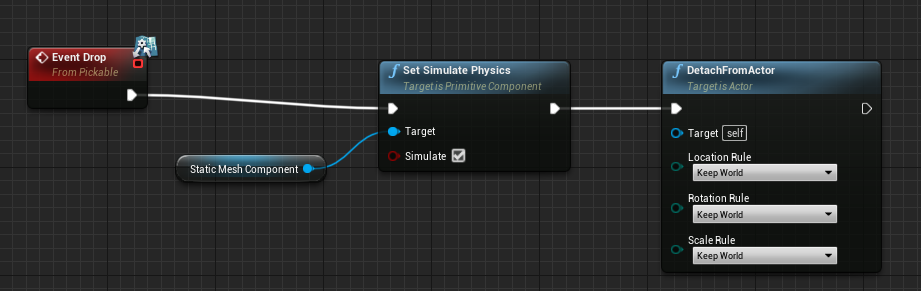
- We have now made it possible to grab this object, but not to drop it. Search and add Event Drop, as well as a Set Simulated Physics node with the Static Mesh Component node. The last node will be DetachFromActor. Connect them like this.
- There is one more thing we need to do before we can pick up this object. That is to give it a collider in order to check if the controllers and the object are overlapping. Go to Components press Add Component and add a Box Collision. Select the Collision component, go to Details and under Collision, set Collision Presets to OverlapAll. Compile and Save and now you should be able to pick up the object.
AR Android
Activating Developer Mode (Phone)
Developer mode has to be activated for Unity to be able to send files directly from Unity/ Unreal Engine to the Phone when building in Unity and also to get a connection.
- Go to settings on your phone.
- Find build number and tap it 7 times to activate developer mode for your phone.
- Stock Android: Go to Settings > About Phone > Build Number.
- Samsung Galaxy: Go to Settings > About Phone > Software Information > Build Number.
- HTC: Go to Settings > About > Software Information > More > Build Number.
- LG: Go to Settings > About Phone > Software Info > Build Number.
- Once this has been done, a message should pop up on your screen: "You are now a developer!"
- Go back to Settings, where you will now find another button that has appeared on your screen. This button is at the bottom of the menu and is called Developer Options.
- Activate USB Debugging, this can be done by Going to: Settings > Developer Options > USB Debugging.
Setting up Unity on you computer
- Open up a new project.
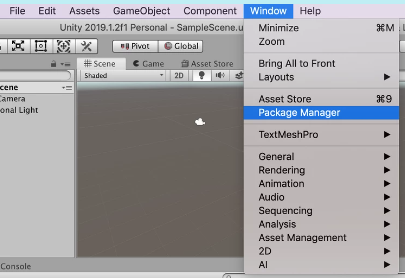
- Go to package manager: Window > Package Manager.
- At the top bar of the new window, click on Advanced > Show Preview Packages.
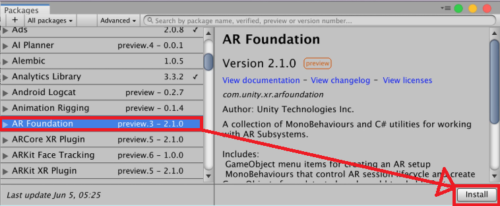
- Install AR Foundation.
- Install the following packages in Unity depending on the Operating System your phone is running:
- Android: ARCore XR Plugin.
- iOS: ARKit.
- Close the window you are currently in.
- Go to: Edit > Project Settings > Editor > XR > ARCore
- Press the Create button.
- Change Requirement from Required to Optional.
- Delete the Main Camera in the hierarchy.
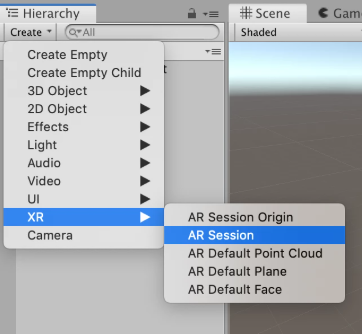
- Go to: Hierarchy > Create > XR > AR Session and AR Session Origin(In newer Unity versions the Create button has been replaced with a + button instead).
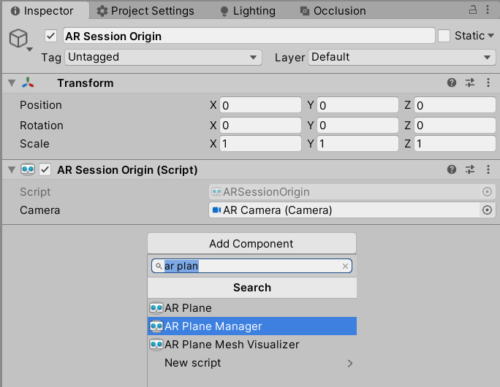
- Select the AR Session Origin, go to the Inspector on the right side of the screen and click Add Component. Search and add AR Plane Manager.
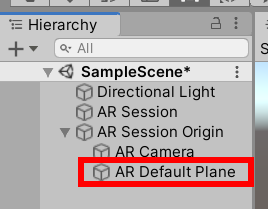
- Inside the Inspector right click and add XR > AR Default Plane.
- Make the AR Default Plane a child of the AR Session Origin.
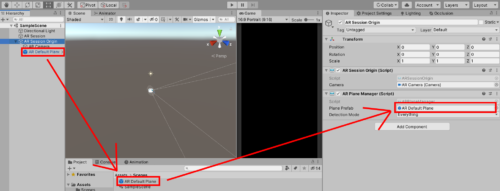
- Select AR Session Origin. Drag the AR Default Plane into the Project panel to make it a prefab. Drag that prefab into the Plane Prefab field in the Inspector.
- Navigate to build settings: File > Build Settings and choose either iOS or Android based on which platform you are making the game for.
- After having chosen the platform you want to build for, press Add Open Scenes. (This adds the current scene you have open to the game when you build)
- Plug you phone to the PC with a USB Cable
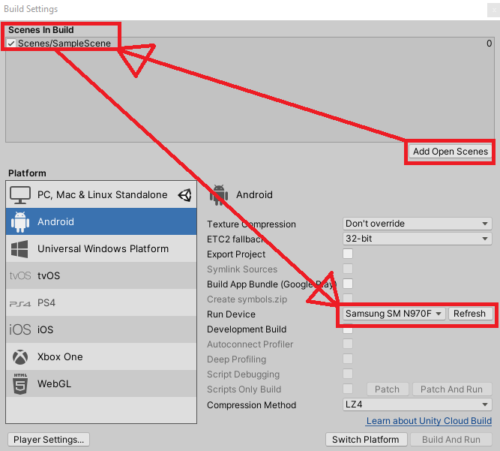
- Once the phone has been connected to your PC, press Refresh beside Run Device. Once that has been done, your phone should show in Run Device list.
- Press the Switch Platform button if the Build and Run button is grayed out.
- Close the current window
- Go to: Edit > Project Settings > Player > Other Settings > Graphics APIs and Remove Vulkan by clicking on it and then the - sign beneath it.
- Vulkan might create errors when trying to build the game for the phone if not removed.

- Vulkan might create errors when trying to build the game for the phone if not removed.
- Navigate to build settings: File > Build Settings and press Build and Run.
Setting up Unreal Engine 4
- On the phone:
- Connect you phone to the computer and make sure to give the computer full access to your phone.
- On the computer:
- Download and install Android Studio from https://developer.android.com/studio.
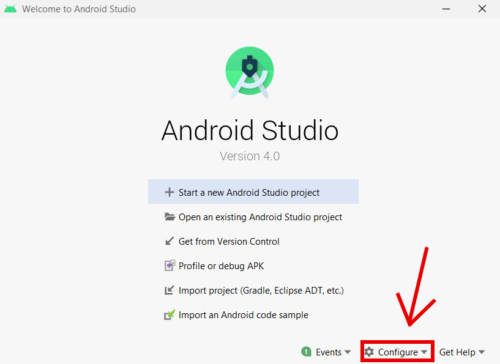
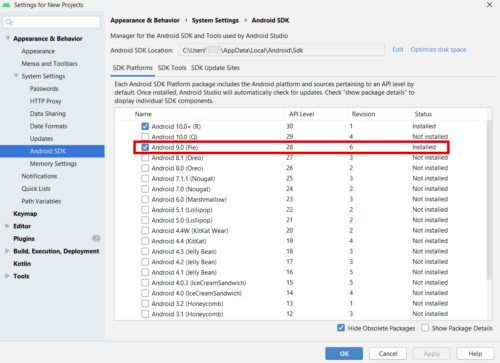
- Open Android Studio and press Configure and SDK Manager.
- Make sure that Android 9.0 (Pie) is installed.
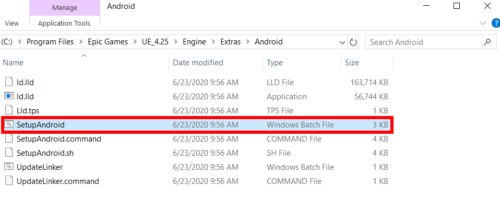
- Now, go to C:\Program Files\Epic Games\UE_4.25\Engine\Extras\Android. Here you should find a SetupAndroid.bat file. Open it. It should open the Command Prompt and automatically install the SDKs you need. If it asks you to accept, press “y”.
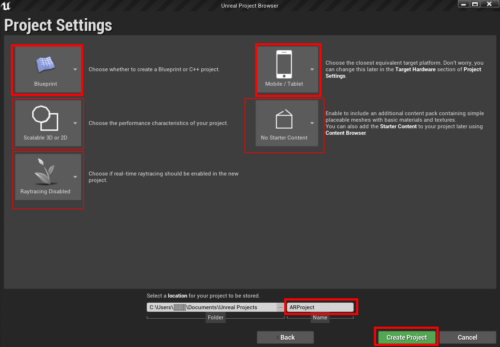
- After the Command Prompt has finished, you can open Unreal Engine 4. Start a new games project, use a Blank template. A window called Project Settings will open, make sure that you are using Blueprint and that the target platform is Mobile / Tablet. I also used Scalable 3D or 2D. Name your project at the bottom and hit Create Project.
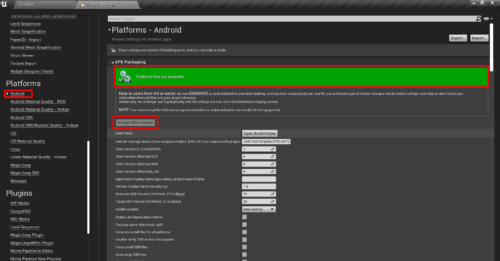
- Inside Unreal, find Settings and open Project Settings. Inside Project Settings, on the left hand side, scroll down until you find Android under Platforms. Under APK Packaging, there should be a red box. Inside there press Configure Now so it turns green. Also make sure to press Accept SDK License, so it appears semi transparent.
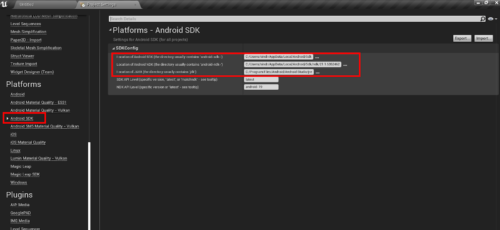
- Under Platforms go into Android SDK. Here you must put in the path to the Android SDK, the Android NDK and JAVA.
- For the Android SDK location, I used C:/Users/[username]/AppData/Local/Android/Sdk
- For the Android NDK location, I used C:/Users/[username]/AppData/Local/Android/Sdk/ndk/21.1.6352462 (The numbers will probably be different for you)
- For JAVA i used C:/Program Files/Android/Android Studio/jre
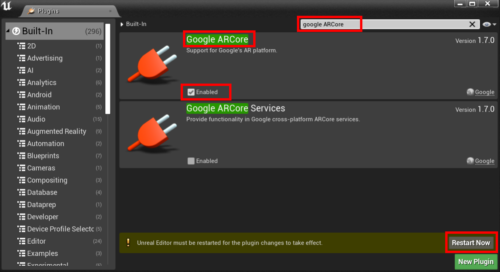
- Now close Project Settings. Find Settings and go to Plugins. Inside Plugins search for Google ARCore.
- Check the Enabled box and press Restart Computer Now.
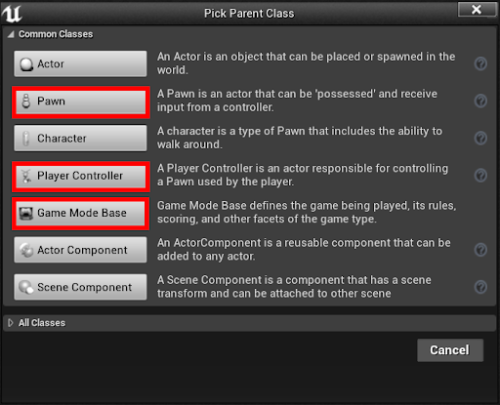
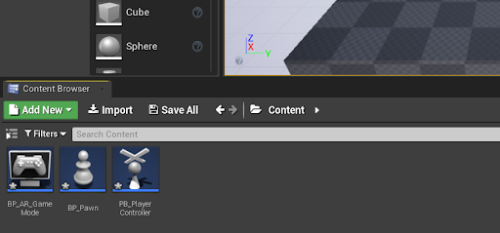
- Now, you need to make three blueprints. Create a blueprint by right clicking inside the Content Browser and clicking Blueprint Class. You will get a window where you can choose what type of blueprint you want. You need a Pawn, a Player Controller and a Game Mode Base.
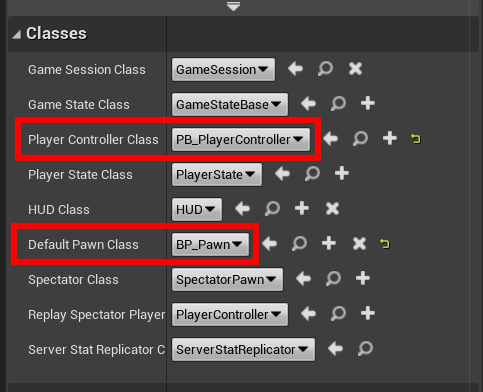
- Open the Game Mode and on the right side of the window, under Classes, that Player Controller Class is set to the Player Controller you just made. Also change the Default Pawn Class to the Pawn you just made. Press the Compile and Save buttons and close the Game Mode.
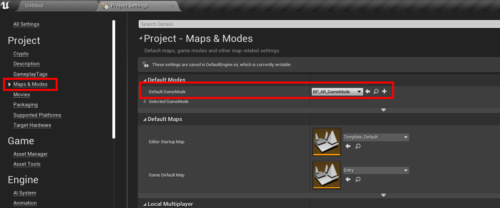
- Find Settings and open Project Settings. On the left side, under Project, find Maps & Modes and click it. Set the Default GameMode to the Game Mode Base you created.
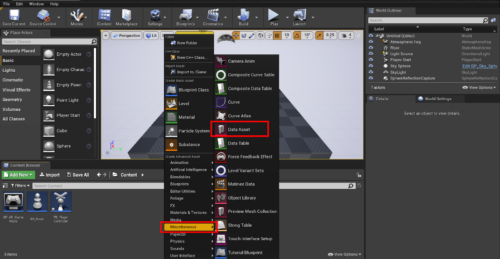
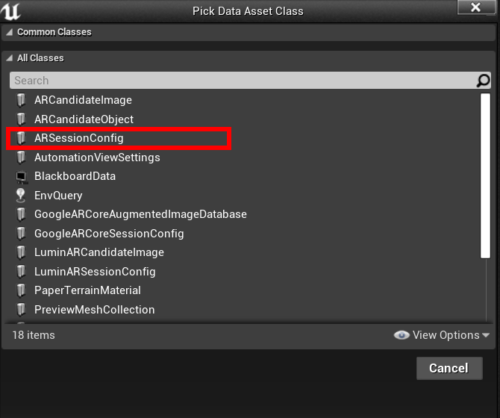
- Now that the Game Mode is set up, you need to add an AR Session. In the Content Browser, right click and inside Miscellaneous, click the Data Asset. A window will appear. Pick the ARSessionConfig and name the Data Asset you created.
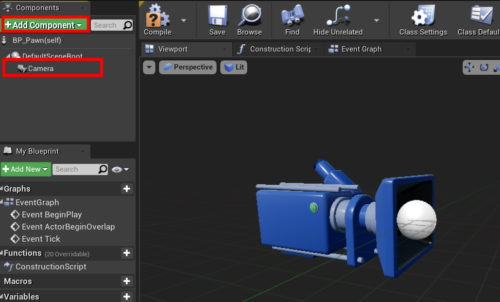
- Go into the Pawn you created and on the left side, inside Components, press Add Component and search for Camera. Add the Camera.
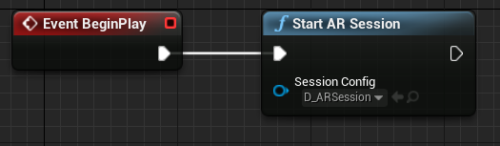
- Go into the Event Graph. Inside the Event Graph, right click, search and add Start AR Session. Inside the node add the Session you made earlier. Connect that node to the Event BeginPlay.
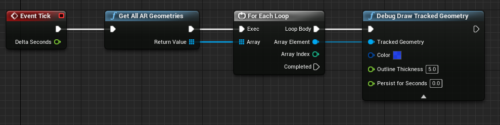
- Now drag out from the Event Tick, search and add Get All AR Geometries. Search and add a For Each Loop in addition to a Debug Draw Tracked Geometry. Inside the Debug Draw Tracked Geometry, choose what color you want. Make sure that it is not the same color as the surfaces in the room you are going to test the AR functionalities. Then connect the nodes like this.
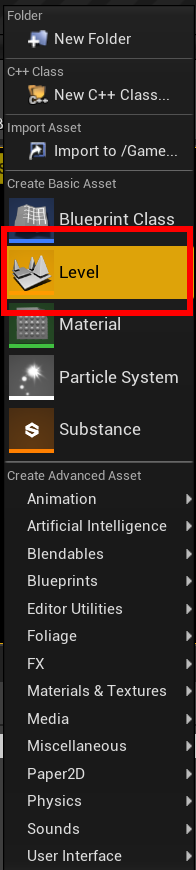
- Before we can test the AR on the phone, we need to make a map for the game to take place in. Right click inside the Content Browser and add a Level and name it.
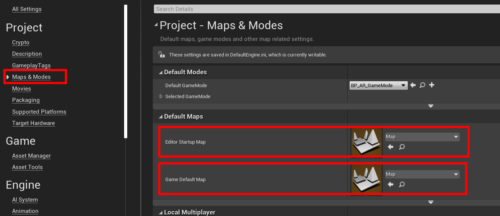
- Find Settings and go into Project Settings. On the left, under Project, find Maps & Modes. Under Default Maps, set both the Editor Startup Map and the Game Default Map to the map you created.
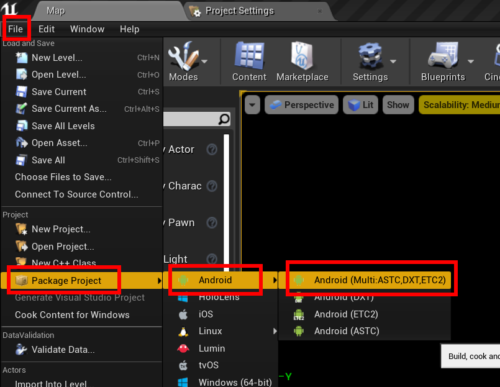
- Now you can package the project and test it on your phone. In the top left corner, go to File, Package Project, Android and choose Android (Multi: ASTC,DXT,ETC2).
- Find a place to save the package and press Select Folder. Wait for Unreal to finish Packaging. Connect your phone to the computer and make sure that the phone is willing to share files. Then double click the Install_[project name]-arm7.bat. When it is done you will have an app on your phone that you can test. Move your phone around and you will see that it is tracking space when the squares and rectangles that are being created.
De-Activating Developer Mode (Phone)
- Go to: Settings > Developer Options > Switch slider from ON to OFF.
- Developer mode is now inactive until activated again.
Read More
- Documentation for the different development programs that Oculus supports: Link
- Unity interface explanation: Link
- Unreal Engine 4 interface explanation: Link
- About developer mode and configurations on android: Link
- AR documentation for Unity: Link
- VR documentation for Unity: Link
- AR documentation for Unreal Engine 4: Link
- VR documentation for Unreal Engine 4: Link